
Welcome to another home repair guide. Today, we’re gonna show you how to replace weather stripping on door. So, how often should you replace your door weatherstripping? Let’s say your door weatherstripping hasn’t been replaced for about 15 years. So, normally, it’s dried out. It’s cracking and letting the warm air go out. It is especially noticeable in the winter when the cold air comes in.
Well, the replacement process is very easy. Throughout this guide, you’ll see how the installation works. To do this, we will choose a specific product whose link is attached. Therefore, you know what we’re working with just in case that will help you with your repair. So, stay tuned.
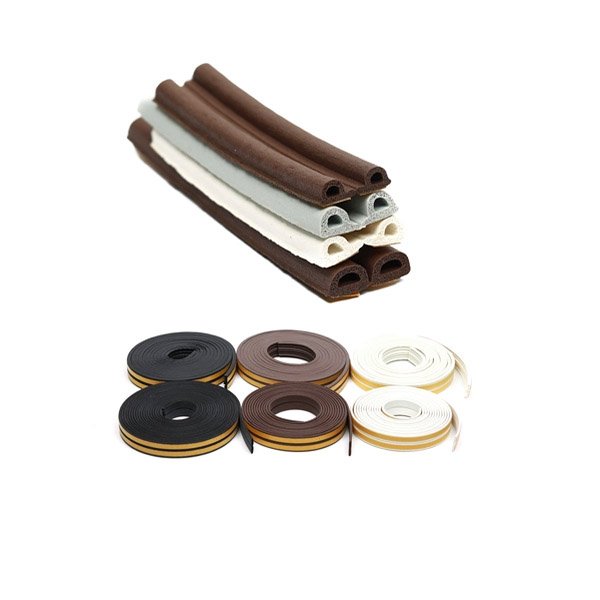
Choose a Door Weatherstripping
When it comes to choosing the right door weatherstripping, self-adhesive options are the easiest. These strips come with an adhesive backing. It allows for simple applications without the need for additional tools or hardware. Whether you’re a DIY enthusiast or a house owner, self-adhesive weather stripping is the best. You know, it provides hassle-free installation.
Self-adhesive door weatherstripping has a variety of shapes and sizes. You can also have a wide range of options for materials & thicknesses. Therefore, you can easily find the perfect option for your needs. Plus, the self-adhesive features ensure a secure seal. You know, it keeps out drafts and moisture effectively. On the other hand, if you want to install the door bottom seal, you can follow a similar process.
How Do You Replace Weather Stripping on A Door
Replacing the door weatherstrip is simple. All you need is some basic knowledge about how a door weatherstrip works. The following step-by-step guide works for most house doors.
Well, the process might be different for some unique or specialized doors. So, if you are using a specialized door, please let us know what type of door you are using. We can come up with a professional installation guide for you.
Preparation
Preparation is the most important step in “How to replace the weather stripping on a door.” While preparing, ensure that you have followed the following steps.
- Check the condition of the existing door weatherstripping. Now, determine the extent of the replacement needed.
- Gather necessary tools & materials. For example, utility knife, measuring tape, adhesive remover, and the chosen type of door weatherstrip.
Remove The Old Weather Stripping from Your Door
Once you are ready with all the necessary tools and materials, remove the old weather stripping. Normally, the door weatherstrip can come out without needing any tools. But, in case it’s tough, use a flat-head screwdriver to remove it. It is normally tough to remove the old weather strip when it has any nails, staples, or tough adhesives.
Clean The Surrounding Places
If the weather stripping is stubborn or has adhesive residue, you can use adhesive remover to clean it. Here’s a tip: If you don’t have adhesive remover, use a hairdryer to apply heat. It can help soften the adhesive. As a result, you can easily peel it away.
We recommend you take your time and work methodically to remove all traces of the old seal strip. You know, it ensures a clean and smooth surface for the new weather stripping to adhere to. Now, once the old weather stripping is completely removed, clean the door surface. You can use mild detergent and water to remove any remaining dirt or adhesive residue.
How To Install Weather Stripping on A Door
Installing a new door weatherstripping requires careful consideration. There are a few benefits of properly installing a new weather stripping. Before discussing the steps, let’s first know the importance of proper installation.
- Durability: Proper installation ensures the door weatherstrip remains securely in place over time. Therefore, it ensures durable resistance against wear and tear.
- Energy efficiency: Properly installed seal strip creates a tight seal around doors and windows. It prevents air leaks and drafts. This significantly reduces the energy needed to heat or cool a home. Ultimately, you will benefit from paying lower utility bills.
- Other advantages like comfort, good air quality, noise reduction, and protection are noteworthy.
Step#1 Measurement & Planning
The first step of installing a new door weatherstripping is measurement & planning. It is especially very very important for precision installation. To ensure accuracy, measuring the dimensions of the door frame is important. This includes both the length and width. If your door has any irregular shapes, it may affect the fit, too.
With these measurements in hand, now plan the placement of the new weather stripping. Check for drafts or gaps. All you need to ensure a perfect seal.
Step#2 Cut the Unnecessary Segments
Normally, the door weatherstripping comes a bit longer. Based on your measurement, cut the exact length. Expert tip: when cutting the new seal strip, leave it slightly longer than initially needed. This extra length allows for adjustment during installation. It also ensures a perfect fit and optimal sealing.
If the seal strip is not installed properly, it may result in gaps or uneven coverage along the door frame. This can compromise the effectiveness of weather stripping. Ultimately, it may allow drafts, moisture, and even pests to enter your room.
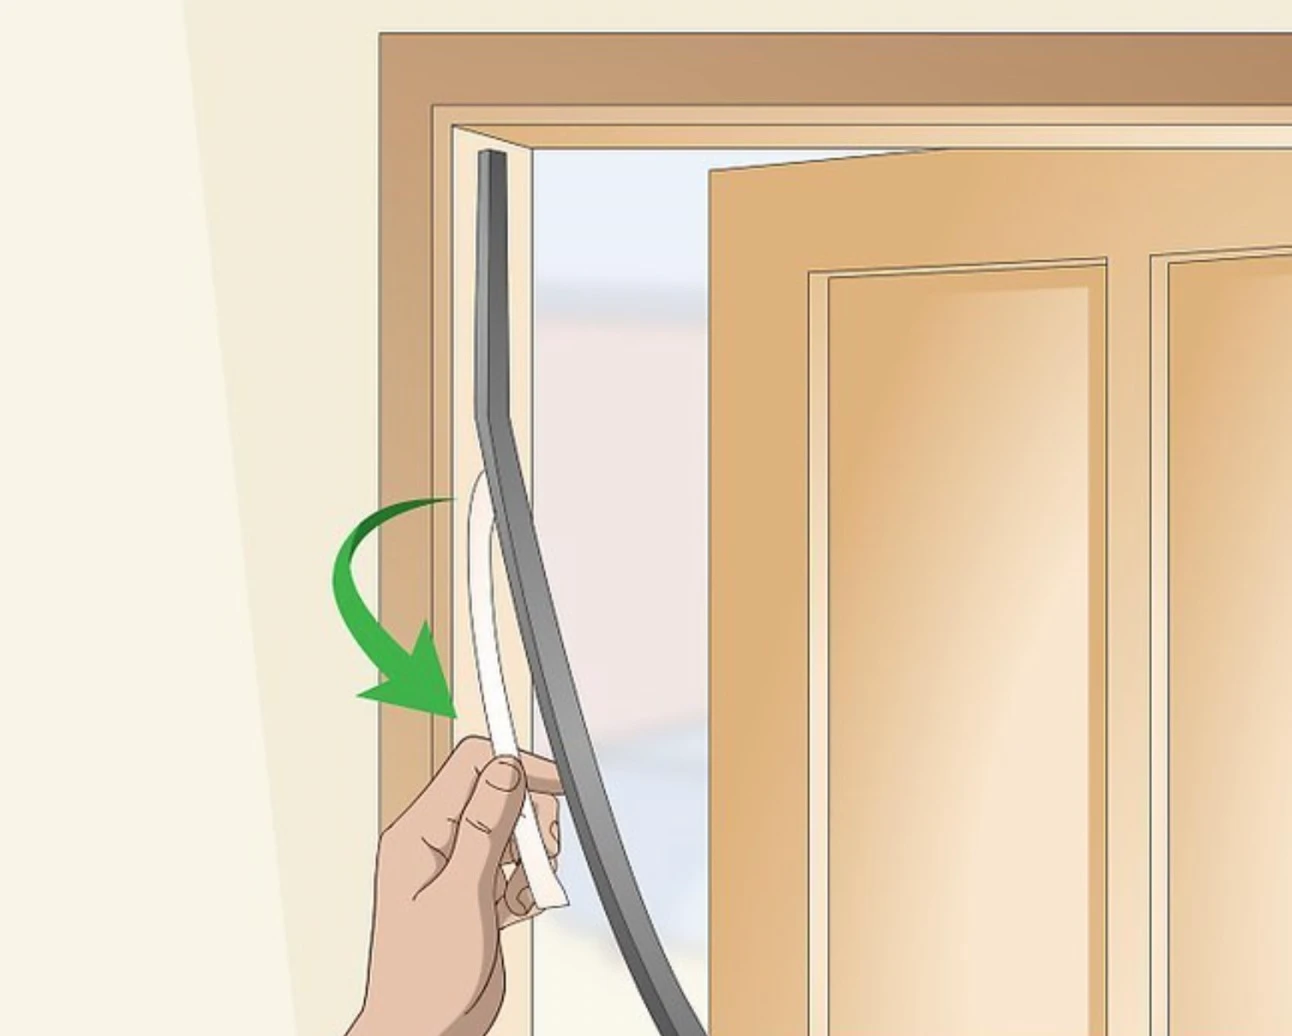
Step#3 Gently Place the New Weather Stripping
Gently place the new weather stripping by first positioning it carefully along the edge of the door frame. Take time to align it precisely. You know, it is necessary to cover the intended area where drafts or moisture may penetrate.
This step is especially important for increasing the effectiveness of the seal strip. Therefore, you must lay the foundation for a secure and airtight seal. Indeed, it enhances energy efficiency and indoor comfort.
Step#4 Remove the Adhesive Sticker from One End to Another End
This step is also very important for effectively installing door weatherstripping. Begin by gently peeling a small portion of the adhesive backing from one end to another. Slowly and steadily, continue to remove the backing. In the meantime, press the weather stripping onto the door frame simultaneously.
This gradual approach ensures a smooth & even application. It minimizes the risk of wrinkles or air bubbles. Take your time. It will help you to achieve a secure and long-lasting bond between the weather stripping and the door frame.
Step#5 Press on the Weather Stripping for a Better Attachment
Pressing on the weather stripping ensures secure attachment. It actually effectively seals out drafts and moisture. After installing the new weather stripping, apply consistent pressure along the entire length. It activates the adhesive and creates a strong bond with the door frame.
You can use a roller or your hands. Just press firmly and evenly to ensure that weather stripping adheres tightly. It also conforms to the contours of the surface.
Step#6 Final Observation
Final observation guarantees the effectiveness of the weatherstripping installation. Check the following observation points:
- Ensure no gaps between the weather stripping and the door frame.
- Verify the alignment.
- Check that the adhesive has properly bonded.
- Open & close the door to verify that the weather stripping does not interfere with its operation.
- Pay special attention to the corners to ensure that they are securely sealed.
- Check for any tears or damage to the weather stripping.
- Evaluate overall fit.
- Note any areas for improvement.
Frequently Asked Questions
Q1. What is the best weather stripping for doors?
Answer: The best weather stripping for doors depends on the door type. In most cases, self-adhesive rubber door weatherstripping is used. Although, there are other types like vinyl clad, PU foam, container doors, garage doors, door bottom seals, fire doors, and many more. Choose a type that provides a tight seal and durability for your specific needs.
Q2. How do I stop rain from coming under my door?
Answer: To prevent rain from entering under your door, install a door sweep or threshold seal. These door bottom seals create a barrier against moisture, too. Ensure proper installation. Indeed, adequate maintenance is necessary to enhance protection from rain infiltration. Door bottom seals may also come in various types.
Q3. Is it hard to replace weather stripping on the door?
Answer: Replacing weather stripping on a door is typically an easy job. Most homeowners can complete it. All you need is a basic knowledge of how a door weatherstrip works. With the right tools and instructions, you can easily finish your job. Overall, the process is relatively simple and doesn’t require advanced skills.
Q4. How much does it cost to replace the weather stripping on a door?
Answer: Normally, a 10m self-adhesive rubber door weatherstripping costs around $5 to $10. You can finish your job within this range if you replace the weather stripping yourself. Well, the cost may vary based on different types of door weatherstrip. On average, the price may range from $5 to $50 based on different materials and shapes.
Contact Us Today
How To Replace Weather Stripping On Door? It involves measuring, cutting, and securely attaching the weather stripping to the door frame. Properly installed door weatherstripping is crucial for enhancing energy efficiency. It is also necessary for maintaining indoor comfort. Moreover, regular maintenance and inspection should be performed. As a result, you can ensure that the weather stripping continues to perform effectively over time.
For more information, feel free to contact us.